How to Get Your Profile Approved on Upwork
I’ve been finding clients on Upwork since 2016, and it has been a great source of ongoing work for me. I’ve been top-rated for a while now, so I regularly get invited to apply for new jobs.
But Upwork has changed since I joined over three years ago. Back in the day, you could just sign up, set up your profile, and start looking for work. But these days, Upwork makes you get your profile approved first.
A personal story
I didn’t even know about this change until one of my friends decided to create an Upwork profile. She was interested in getting started as a freelancer, so I recommended that she give Upwork a try.
A couple of days later, she texted me saying that her Upwork profile had been turned down. According to Upwork, this was due to a lack of opportunities in her area of expertise.
I should add that my friend has over 10 years of experience in project management. So clearly, Upwork didn’t turn her down due to a lack of skills or expertise.
She just didn’t create her profile in a way that articulated everything she had to offer. With a few simple tweaks, she was able to improve her profile, resubmit it, and Upwork approved her shortly after that.
Why is Upwork rejecting my profile?
According to Upwork, the platform gets around 10,000 new signups per day. Upwork provides access to more clients than any other job board or freelancing site, so a lot of people want to be on there.
But what happens is that the marketplace gets flooded with freelancers. And many of these individuals either don’t have any relevant skills or aren’t serious about freelancing.
Upwork can’t manually approve or deny 10,000 applicants per day, so they created an algorithm to do the screening process for them. I actually think the approval process is a good thing, and I’m glad Upwork is doing it.
The fact that you’ve been approved to look for work on the platform means that clients will automatically take you more seriously. You’ll also face far less competition when you’re looking for work.
And if your profile gets turned down, it’s not the end of the road for you. There are a few very strategic steps you can take to improve your odds for approval next time.
How to get your profile approved on Upwork
If your profile has been turned down in the past, please don’t despair. It’s not a sign that you should give up or that you’re not qualified to be a freelancer.
You just need to know what Upwork is looking for in potential freelancers. Here are seven steps you can take to get your profile approved on Upwork:
1. Use a business email address when you sign up
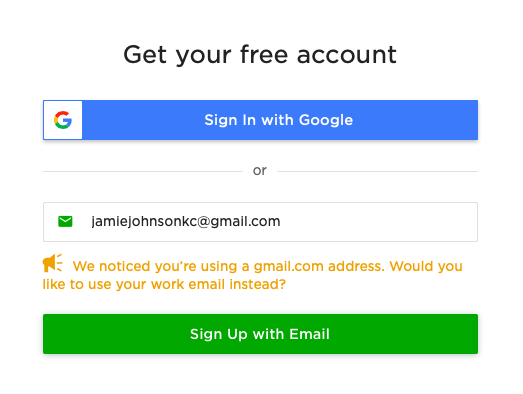
You’ll use your email address to sign up for an Upwork account. And one of the first things you’ll notice is that Upwork prefers a business email address.
In fact, if you try to use anything else, you’ll get a notice like this one:
Why does a work email address matter? Well, it matters because Upwork is looking for professional freelancers. So taking the time to set up a business email account is a great way to show Upwork that you’re serious about freelancing.
Fortunately, it’s not hard to set up a business email account. I recommend taking five minutes and setting up your own through Gmail.
2. Pick as many subcategories as possible
After you sign up, Upwork will give you the option to choose what categories and subcategories you’ll be looking for work in. You can add up to 10 subcategories, so I recommend choosing as many as possible.
A variety of subcategories shows Upwork that you’re qualified to apply for a lot of different jobs. It shows them that you’re a more diverse freelancer and that you’ll be a good match for a variety of clients.
Not sure what to choose for your subcategories? Have a peek at mine:
3. List all your relevant skills
Next, you’re going to enter all your skills. You can choose up to 10, and once again, you should pick every skill you feel is relevant.
I would encourage you not to overthink the skills section. Upwork will prompt you with possible skills, so just pick 10 that you feel are a good fit and move on.
You can always update this later. But if you’re really struggling, you can check out other freelancer’s profiles and see what skills they picked.
4. Fill out your overview section
The overview section is kind of like your “about me” page for Upwork. It’s where you talk about yourself, your background, skills, and what you have to offer.
And it’s also the first thing clients will see when they come to your page, so it needs to be good. So my advice is not to skimp on this section.
Really put some thought into it and make sure it’s at least a couple of paragraphs. Format it so it’s easy to read and skim through and not just one big block of text. Here is a look at my overview:
5. Come up with a specific title
Now it’s time to come up with your title. Your title is the succinct phrase that will summarize your entire professional experience and what you plan to offer clients.
But no pressure, right?
I know coming up with a good title can be challenging when you’re not entirely sure what you want to do. I would try to narrow in on the type of work you think you’d like to do and start there.
For instance, my headline is “Personal Finance Writer/Blogger.” But if you don’t have a clear niche just yet, you could pick something like “Freelance Blogger for Small Businesses.”
6. Add all your employment and education history
When I first got started on Upwork, I had a tough time filling out my employment and education history. Mostly because I hadn’t graduated from college and had a very limited job history up until that point.
For those reasons, I was pretty tempted to skip over those sections. But I knew it would look worse if I didn’t include anything, so I gave it my best shot.
One of the things I did to bolster this section was to include some of my volunteer experiences. For instance, I served on the Board of Directors at my Church and volunteered briefly for a couple of different organizations in Kansas City. So I included all of those experiences in my profile.
And I filled out my college education experience as well. I included where I went to school and what my major was and left it at that. And to this day, not one person has asked me about it.
No one has ever asked me about this!
7. Choose a professional rate
Upwork will make recommendations for your rate depending on your skill level.
When I first signed up on Upwork, I set my hourly rate at $8 per hour. That’s about what I had earned when I worked at Starbucks, so I figured it was a reasonable starting rate as a freelancer as well.
If you set your rate at $10 an hour or less, here is what it tells Upwork and potential clients:
You have virtually no experience
You don’t have a lot of skills
You’re not confident about your ability to deliver for clients
You can’t produce high-quality work
I’m guessing that’s not the impression you want to give potential clients, so take yourself seriously. Don’t overstate your abilities, but don’t understate them either.
$30 an hour is the absolute lowest hourly rate I would recommend. And as you gain more experience, your rate should increase accordingly.
Final thoughts
Hopefully, this article has shown you that with a few simple tweaks, you can get your profile approved on Upwork. But my last point is not to overthink this process.
Don’t spend hours researching tips on how to create the best profile overview or how to come up with the perfect title. Just do your best and move on.
You can always come back and improve your profile later. And if your profile isn’t approved, you can always update it and try again.
If you want to learn more about how to find clients on Upwork, you definitely need to sign up for my free training, How to Use Upwork as a Freelance Writer. This free webinar will teach you five things you need to know about how to get started on Upwork.
So if you’re ready to kick-start your freelance writing business, it’s going to give you the tools you need to get started. You can sign up here:


